Managing Approvals
When a proposal is ready, send it to the vendor for review. When the details of the plan are agreed upon, approve the plan.
You can opt in to receive a daily email with a list of campaigns that have received first approval within the last 24 hours on the Notifications tab.
If there were multiple approvals, select Expand to see a history of the approvals with version numbers.

To manage approvals:
-
Go to Main Menu [
 ] > Campaigns.
 -
Select the campaign and media plan.
-
Select Actions > Approvals in the upper-right corner. The Approvals panel appears.
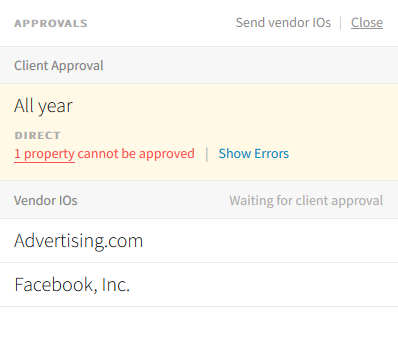
The Approvals panel lists the status of approvals and vendor IOs. When there are multiple versions, you view the most recent approvals and IOs at the top of the list.
-
If there are error messages saying that properties cannot be approved, hover over the message to see which properties are affected. Refer to Approvals And Vendor IOs Side Panel Status for information about these error messages.
-
To edit the properties, select Show Errors. The media plan opens with all of the line items in edit mode.
-
Edit the line items and save your changes. To exit without saving, select Exit for each line item.
-
-
For vendor IOs, select Contract or IO to review a summary of the plan. To approve the plan on the Approvals panel:
-
Select Proceed without an IO to approve the media plan. The vendor receives a confirmation message.
-
Select Send vendor IOs to preview the IO summary and submit it to the vendor.
When the vendor insertion order is not required, the media plan does not show the contact user, RFP, proposal updates, revised plans, or IO options.
-
-
When the vendors have confirm the plan and there are no errors, select Approve plan.
-
Close the Approvals panel to return to the media plan.