DSP Inventory Forecast
![]()
Check out our AdTech Academy Course to learn more!
DSP inventory forecasting uses historical data to determine the maximum number of impressions available at different bid amounts based on tactic settings. Create a forecast to:
-
Predict available inventory and plan DSP line items without creating dummy campaigns and tactics or uploading creatives.
-
Share data with clients and update forecasts based on feedback or new information.
-
Identify and capture opportunities to upsell clients.
-
Gather more data to share with prospects.
After you create a forecast, you can use it as a template for new tactics. See Creating Tactics From Forecasts.
You might notice discrepancies between DSP inventory forecasts and tactic-level forecasting. Tactic forecasting incorporates more granular information such as specific flight dates and exchanges to help you build and monitor tactics, while DSP inventory forecasts are based on broader parameters to help guide campaign planning.
Before creating a forecast, you should understand what sort of campaign you want to run and know the general targeting and inventory settings that you will use for your tactic.
All values are net. Forecasts are an estimate only and do not guarantee results. Forecasts are built on real-time market conditions and are subject to change due to fluctuations in inventory sources, the size of the user segment pool, market seasonality, overall market growth, and other factors. Forecasts with narrow targeting parameters may also be subject to statistical fluctuation due to the size of data and results may appear as "N/A."
To create a DSP inventory forecast:
-
Go to Main Menu [
 ] > DSP Inventory Forecast.
 -
Select Create forecast to open the forecast editor.
-
Enter the settings that you plan to use for the tactic. The forecasting tool doesn't include all tactic options—it only includes the settings required to create a forecast. For more information about these settings, review the Tactic Editor Guide and related topics.
If the tactic's settings are too narrow and the reach is too low, or if there is insufficient historical data for the selected parameters, we may not be able to generate a forecast.
-
On the General tab, enter a name for this forecast and select the Frequency Cap, which is how often you want to show your ads to an individual user.
-
On the Location tab, select the countries, regions, cities, DMA codes, ZIP/postal codes, geopolitical locations, or location sets that you want to target or exclude. You must select at least one location to create a forecast.
-
On the Device tab, select inventory and device types.
-
On the Audience tab, select the 3rd-party audiences or audience sets that you want the tactic to target.
-
On the Contextual tab, select the contextual segments (such as Sports or Technology) or contextual sets that you want to target.
-
On the Domain tab, add domain lists or a domain list set and select the Supply Path Optimization options that you want to use.
-
On the Private Marketplace tab, add any curated deals or custom deals.
-
On the Brand Protection tab, select the brand protection segments or sets to exclude from targeting.
-
On the Creative tab, select the creative formats and sizes for the ads that you plan to use with this tactic. You don't have to upload any creative files. If you don't specify creative details, the forecast accounts for all formats and sizes.
-
-
Select Forecast to see the projected spend, available impressions, impressions by device type and creative size, and the daily impressions.
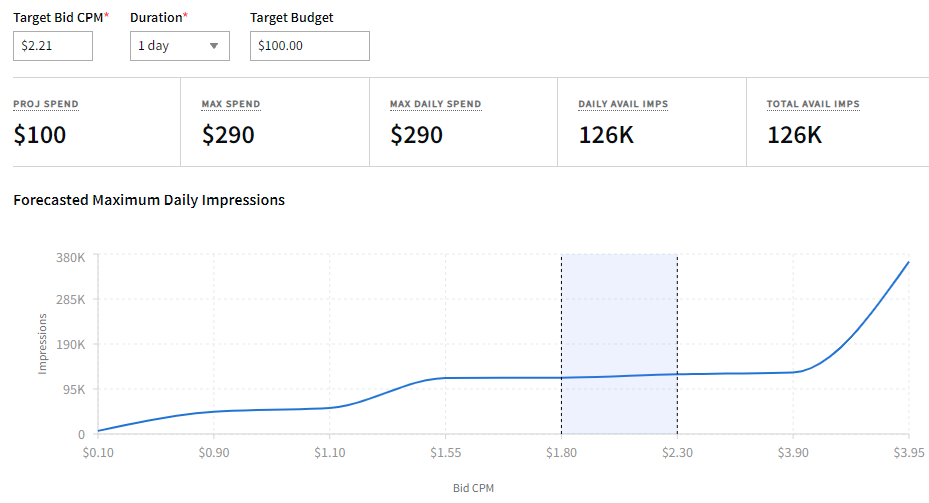
The Forecasted Maximum Daily Impressions graph shows the estimated impressions that the tactic can win at different CPM bid amounts. The highlighted section of the graph indicates the optimum bid range. If you set a very high target bid, this graph doesn't show any useful information because very high bids would win more than the maximum number of available impressions.
To update the forecast:
-
Change the default Target Bid CPM.
-
Select a different Duration:
-
1 day
-
1 week (7 days)
-
1 month (30 days)
-
-
Enter the Target Budget to see projected spend based on the forecast's parameters.
-
Edit the forecast's settings.
-
-
Save the forecast. Other members of your organization can see the forecast and can duplicate it, but cannot edit or delete it.
To see your forecasts, filter the forecasts by Created By > My Forecasts.
To edit, duplicate, and delete forecasts:
-
From the forecast's Options [
 ] menu, select an action:
-
Edit: Change the forecast's settings and parameters. Only the user who created the forecast can edit it.
-
Duplicate: Create an exact copy of the forecast. This is useful if you want to adjust certain settings to see how that impacts the forecast and compare it to the original.
-
Delete: Remove the forecast. You can't recover a forecast after you delete it. Only the user who created the forecast can delete it.
To delete more than one forecast at a time, select the forecasts, then select Bulk delete in the upper-right corner.
-